Install

Thanks again for choosing BlackFlameCustoms.
— Please leave us feedback here —
Please share any installed or on vehicle pictures you may have. Your submitted pictures
are always a great addition to our Examples Gallery.
STOP – READ DIRECTLY BELOW FIRST
Please verify your box contents and read the installation guides below – first. This section also contains almost any/all troubleshooting issues that may come up – please refer to them before contacting us.
Troubleshoot
— Important Headlight Housing Finish Info & Questions —
Many of our build packages include OEM Replica headlight housings. It is VERY strongly suggested that once your headlights are installed, tested and working as planned you visit a local tint or automotive shop to have a CLEAR PROTECTIVE film installed.
This is often inexpensive for a pair of headlights but protects them for a number of years from chips, scratches and especially UV fading.
Wiring Installation
The information below typically applies to HID equipped systems. In general, LED built headlights or LED headlight packages will have small external wire/harness controllers vs a full wiring harness.
Wiring Harness Installations : PDF Format
Please note: It is recommended to use a SMALL amount of dielectric grease on all harness plug connections during your installation – this helps prevent corrosion & moisture issues for long term reliability.

Ballast installation
The information below ONLY applies to HID equipped systems. In general, LED built headlights or LED headlight packages do not have ballasts.
1. DIAGRAM FOR USE
As part of the installation process, ensure all connections “click” together with their respective plugs to maintain water-resistant properties for the connection.While the ballast does not need to be grounded, we recommend it. NOTE: We do not guarantee proper function without the use of an approved Morimoto wire harness or proper plugs pre-installed on the housings by us. The diagram below shows Morimoto ballasts, but this basic info applies to ALL ballast brands we supply with kits.

2. IGNITER CONNECTION
As part of the installation process, ensure the connection between the igniter and ballast box are fully seated, with the clip holding the connection tight. The igniter must be snug in the ballast output to ensure no damage results.

3. BALLAST MOUNTING
We recommend mounting the ballasts in the indicated directions to ensure no water penetration into the connectors. The connections cannot exit at the top as that causes water to pool up inside them. This is generally achieved by mounting the ballasts in ANY accessible spot behind or near the headlights that you see fit for your specific vehicle application. Optionally double sided heavy duty foam tape can be used to mount the ballasts to a clean metal surface.
Suggested spots: Radiator support brackets or metal tabs / frame tabs / fender walls (inner)

4a. D2S BALLAST HEAD
To ensure you do not damage the D2S bulb upon installation, we recommend topush the head of the ballast until it is fully seated against the bulb. Then turn the D2S head to lock it onto the bulb. NOTE be mindful that the tabs on the side of the bulbs must be fully seated in the ballast head prior to turning the ballast head to lock it. They are fragile and must be used with care. If you hear a “zapping” noise, the ballast head is not fully seated on the bulb and may cause permanent damage / fire.

4b. TROUBLESHOOTING
If you hear a zapping noise, check the connections to ensure they are all fully seated.

Bulb installation
The information below typically applies to HID equipped systems. In general, LED built headlights or LED headlight packages may have removable bulbs OR may have integrated LED chips.
Bulb Information:
The bulbs in your new headlight retrofit system will come pre-installed, unless otherwise noted or if you ordered components separately. Below is an example picture of how to properly clean an HID bulb prior to installation, should one need to be replace or if you are installing them on your own (again, the components were purchased separately and bulbs were not sent to us for the build).


Halo installation
Please Note: We are NO LONGER installing halos on new custom builds due to extreme reliability issues. This section has been kept in place for reference only.
Halos/Options Installations:
DO NOT INSTALL HALOS WITHOUT THEIR INLINE INVERTERS – THIS WILL DAMAGE AND VOID THEIR WARRANTY

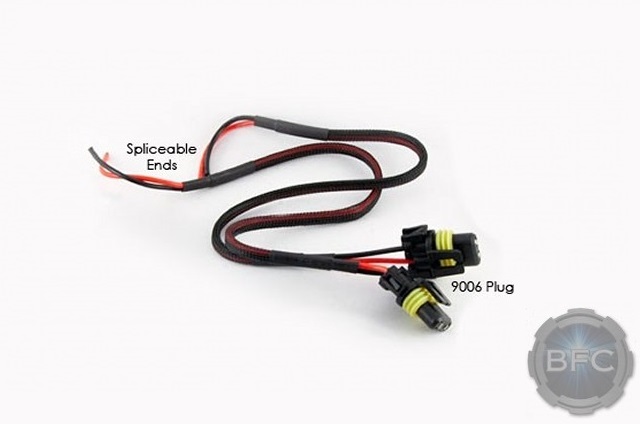
This is a straight forward process. The first step is to decide & locate which circuit you want the halos to turn on with. The most common selection is the parking light circuit. A test light or multi-meter may be needed to ensure you have selected the correct wire on the vehicles electrical harness you plan on tapping into. Next, strip back a 8-10mm portion of the wire backing on the vehicle harness. You will splice the RED wire for the halo power plug into this wire. Then, ground the BLACK wire to a good chassis ground on the halo wiring plug. Cover these wires with electrical tape or shrink tube as needed.
Last, the plug that was just tapped into the parking light circuit & chassis ground will correspond with the above noted 9006 Style Power Plug in the image. Test for proper functioning & continue the installation of your new headlight system.
If your vehicle headlights come with a wiring harness on them that then plugs into the vehicles main harness, we will pre-install your halo wiring for you. We most often set them up on the parking light circuit.
Aiming Headlights
Alignment, Adjustment & Tweaks:
It should be noted that proper patience, time and surroundings should be available to adjust your lights. It may take a few trial and error adjustments to get them just right and to your personal liking.
All the alignments on your housings can be done through the factory adjustment knobs. If your output is rotationally off there are notes regarding this below, however, please contact us for special assistance as this may indicate an underlying issue.
DO NOT OVER ADJUST ALIGNMENT KNOBS – This can potentially cause damage to your new headlight system. Please contact us should your adjusters not function properly or feel too snug.
- -First, find a good level ground area to park your vehicle on that has an adjacent broad-sided building. Park approximately 30 feet away & facing the wall.
- -Next, measure the distance from the ground to your projector inside the headlight (let’s use 30 inches as an example).
- -With your headlights turned on, measure the lower portion of the DRIVER cutoff step. The goal is for the cutoff step to be approximately 2 inches lower than your projector measurement. So, in our scenario, 30 inches minus 2 inches gives us 28 inches.
- -Then simply align your PASSENGER projector to the same point as your left one.
- -Road test and adjust slightly up or down as needed.
The general adjustment range is 2-4 inches LOWER than what your projector measures, depending on your personal preferences.

Output Tweaks & Rotation:
This section is a basic explanation of projector output that looks “off”, “bad”, “tweaked” or “incorrect”. There are any number of reasons this could have happened to your new headlight retrofit package and what we’ve seen most often as the culprit is shipping damage. The internal components on our headlight builds are extremely reliable & sturdy with regards to standard vehicle use — however, when rough package handling or an overloaded delivery truck puts unexpected stress on a package, something can go wrong.
Below are a few example images of “off”, “bad”, “tweaked” or “incorrect” projector cutoff output. There may be a simple adjustment you can make to rectify the issue or it may require shipping the headlight back for us to repair.
Output Tweaks & Rotation:
This mini-writeup is intended to help you make any basic rotation/output tweaks as needed with your setup. It should be noted that the headlight housings should NOT be opened, modified or altered in any way to do these steps as this voids our warranty – what we’re explaining here are simply adjustments that can be made. .25mm to .5mm can make a big difference in terms of rotation.
MH1 & D2S v2.0&v3.0 Projectors
These projectors are primarily installed using their threaded in collars. While we snug them up very securely and add epoxy to keep things from vibrating loose, there is still a bit of built in rotation adjustment.
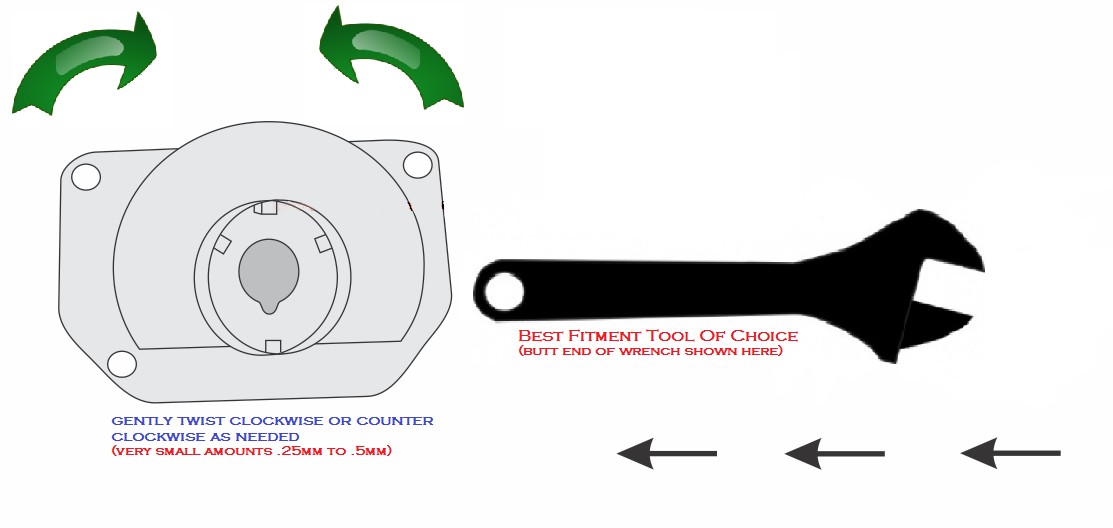
-Step 1: Ensure you have the basic tools needed (screwdrivers, sockets, work gloves & projector adjustment tool).
-Step 2: Projector adjustment tool is ANY properly sized tool/object that fits into the bulb slot opening on the back – for MH1’s this is often a pair of scissors – for D2S v2.0’s & v3.0’s this is often the butt end of a ratchet.
-Step 3: Park your vehicle in a good sized lot facing a level flat wall (approximately 30 feet away), take not of the projector output/rotation.
-Step 4: Remove the bulb from your projector that needs a rotation tweak/adjustment (if both, start on drivers side).
-Step 5: Insert the “projector adjustment tool” as noted above and GENTLY twist in the direction needed – if the RIGHT side is low – twist COUNTER-CLOCKWISE – if the LEFT side is low – twist CLOCKWISE.
-Step 6: Re-install bulb (without touching glass) and test output.
-Step 7: Repeat as needed until projector is level (generally 1-2 tries of GENTLY twisting does the trick).
-Step 8: Repeat procedure on opposing side headlight as/if neeeded.
Please contact us should something about your new setup seem out of place.


Damage during shipping
If any part of your package, headlights or contents was damaged during shipping – please contact us BEFORE contacting the shipping company. Sometimes filing a claim can take much longer than expected and runs the risk of the shipping carrier potentially collecting the box or boxes for inspection.
If a simple fix is available (whether by us or you), this is often preferable to a full claim investigation.
Please use our support page and we’ll respond as quickly as possible to help access damage and a solution. Emails are the best method for contacting us.
Parts missing in the box
Double check all the contents of your packages to ensure everything was included with your build. This can include (but is not limited to), wiring, ballasts, bulbs, pigtails, plugs, LED bulbs, inverters, our warranty w/instructions link card and any other specific build items.
It’s important to confirm all items are received so a proper installation can take place.
Please contact us on our support page if you feel something is missing from your packages.
Lights won’t turn on
If your headlights BOTH won’t turn on after completing your installation this could be due to a few different things.
The first thing to check and confirm are ANY & ALL grounds for the system. A radiator bolt is NOT a sufficient ground. We recommend a direct battery or bare chassis ground – as noted in the installation instructions PDF file.
Next – check ANY & ALL fuses related to the headlight system. This includes any fuses built into your vehicle from the factory as well as any on the new harness we supplied (if applicable). Replace as needed.
Last – check all your sockets and connections. Sometimes when connecting two sockets a pin can be pushed out or bent which can cause a lack of electrical contact. Repair by simply pushing back in OR bending into place as needed.
One light won’t turn on
If one side headlight won’t turn on, we recommend following the procedures below :
The first thing to check and confirm are ANY & ALL grounds for the system. A radiator bolt is NOT a sufficient ground. We recommend a direct battery or bare chassis ground – as noted in the installation instructions PDF file.
Next – check ANY & ALL fuses related to the headlight system. This includes any fuses built into your vehicle from the factory as well as any on the new harness we supplied (if applicable). Replace as needed.
Last – check all your sockets and connections. Sometimes when connecting two sockets a pin can be pushed out or bent which can cause a lack of electrical contact. Repair by simply pushing back in OR bending into place as needed.
If none of these sort the issue out – please swap ballasts from side-to-side, to see if the issue follows the ballast OR is specific to that side. If the issue follows the ballast, you may have a defective ballast. If the issue STAYS on that specific side of the vehicle – you likely have a wiring or harness issue.
Please contact us on our support page regarding a faulty ballast.
My lights flicker but won’t fully turn on
If your headlights only “flicker” or rapidly pulse but WON’T fully turn on there may be a few underlying issues.
Check all your grounds, connections, socket pins and fuses.
Your vehicle battery may be weak. Try starting the vehicle, allowing it to charge for one minute and then try turning the headlights on again.
You may have the “auto-on” option selected for your headlights. This can sometimes cause a voltage regulation issue going to a newly installed headlight harness, causing the ballasts not to receive full power. We recommend turning the “auto-on” feature OFF.
Is your vehicle canbus equipped or does it have computer controlled headlights? Often times these types of vehicles should have special controllers sent with the headlights to avoid any computer interference or issues. This should be indicated or noted at the time of your build sheet organization (before any work began).
High beams are on instead of low beams
If your high beams are on or activated when your first turn your headlights on (LOW BEAM ONLY) there may be a control wire switched on the harness.
Note: This often refers to vehicles that have a single bulb for both high beam and low beam operation from the factory – such as H4, 9007 or H13.
As a variety of vehicles all use the same bulbs (H4, 9007 or H13) for dual beam operation, their wiring and internal control systems are NOT all the same.
This is a simple fix that takes just a few minutes. The 3 wire control socket that plugs into ONE side of the vehicle simply needs it’s pin positions switched. Simply “un-click” the pin from the control socket (as shown below) and switch positions. The wiring harness can NOT short out or be damaged by doing this. There are only a few combinations that will work, so switch the pin positions and retest as needed.


Wobbly or bouncy output
HID projectors by their very nature have super sharp and clear output. This is almost razor-like on a wall or flat surface.
With properly adjusted and aimed headlights you’ll notice the cutoff steps. These may appear to be slightly bouncy while driving. This is normal due to the fact that the vehicle is also bouncing/moving/vibrating during normal driving conditions. You’re simply not used to seeing the sharp light output on the road – this does take a bit of getting used.
This can also be referred to as color flicker. What this means is that the projector cutoff line (that sharp “step” you see when parked in front of a wall, is moving in and out of the field of vision while driving – this is perfectly normal.
If one headlight (or potentially both) seem to be extra bouncy, not moving with the rhythm of the vehicle or very “jerky” in motion there may be internal damage to the lights. This can sometimes occur from shipping damage. This may be a symptom of the internal pivot points being popped off.
My projector rotation isn’t level
If the light output is off by rotation or incorrect, there are a few adjustment or “tweak” methods available to help correct this. While there are a number of variables that can affect this – generally this can be corrected as most often an extremely small movement makes a big difference – even just .25mm to .5mm.
Please see or search our FAQ on AIMING LIGHTS — HERE
Output is aimed too low
If the light output is too low, you should have enough adjustment range from the OEM adjustment knobs on the lights to raise them. Generally just a few millimeters makes a big difference on the road.
Please see our FAQ in this section on AIMING LIGHTS
If your adjustment knob is is NOT making any difference in the light output – please refer to our FAQ in this section PIVOT POINT GUTS RESET
Output is aimed too high
If the light output is too high, you should have enough adjustment range from the OEM adjustment knobs on the lights to lower them. Generally just a few millimeters makes a big difference on the road.
Please see our FAQ in this section on AIMING LIGHTS
If your adjustment knob is is NOT making any difference in the light output – please refer to our FAQ in this section PIVOT POINT GUTS RESET
One headlight has fuzzy or blurred output
Your HID projectors have been double tested prior to them being built into your lights.
If the output on one projector is drastically different compared to the other (ie. fuzzy, blurred, severely-bowed or otherwise NOT sharp) this may be due to a bulb seating issue.
If this is a D2S bulb the socket may be pushing against something causing the bulb to mis-align. Check the socket and re-install – re-seat the bulb as needed.
The same can be checked for H1 bulbs in an MH1 projector system. Remove the bulb and re-seat then test the output.
Both lights flicker intermittently
If your headlights “flicker” or rapidly pulse intermittently, there may be a few underlying issues.
Check all your grounds, connections, socket pins and fuses first. There may be a loose connection or plug somewhere in the system.
Your vehicle battery may be weak. Try starting the vehicle, allowing it to charge for one minute and then try turning the headlights on again.
You may have the “auto-on” option selected for your headlights. This can sometimes cause a voltage regulation issue going to a newly installed headlight harness, causing the ballasts not to receive full power. We recommend turning the “auto-on” feature OFF.
Is your vehicle canbus equipped or does it have computer controlled headlights? Often times these types of vehicles should have special controllers sent with the headlights to avoid any computer interference or issues. This should be indicated or noted at the time of your build sheet organization (before any work began).
Not both headlights start all the time
If only ONE headlight fires up this may be a wiring issue.
First, check all the vehicle fuses associated with the headlight systems. Sometimes a fuse can pop during installation and may need to be replaced.
If the fuses are good move onto the connections and plugs for the new headlight system. Ensure all the plugs are connected securely, that no plug pins have been pushed out and that any and all grounds have a GOOD connection.
Last – it’s possible that a bulb or ballasts failed for some reason – we test all the components before shipment, but sometimes things just fail. To confirm – try switching the bulbs and/or ballasts from side to side. See what the problem follows.
High beams don’t work
If you’re high beams don’t work there may be underlying reasons.
First – which type of system do you have? Did the vehicle have ONE bulb for both low and high beam operation OR is it a split system, meaning there was ONE bulb for low beam and ONE bulb for high beam?
With a SINGLE bulb for high and low beam, a new wiring harness was included with your build. This controls the output and keeps the HID bulb on while activating the high beam solenoid within the projectors. If your high beams do NOT work within this system, check all connections, grounds and fuses. If you are still only getting low beam operation, disconnect the high beam pigtails on ONE side and check for pushed out pins or bent pins. If the pins look good & straight then test the pins with DIRECT battery power (this can be done with alligator clips to the battery OR a 9 volt battery) — you’ll be testing the pins on the plug going INTO the projector (not into the harness).
If the high beam solenoid clicks and makes it’s noise – you likely have a connection problem to the main harness (a pin may have pushed out or is bent). Check all connections at the “brain-box” main bulk-head of the new wiring harness.
If your system is the split system with ONE bulb for low and ONE bulb for high beams – check to see that the new HID projector high beam pigtail is connected or tied into the stock halogen high beam bulb with a splitter OR that it is hard-wired.
Note: In a split system, it’s possible to have a low beam only HID projector installed – this is NOT a bi-xenon projector and will have no secondary high beam – your build sheet would have this indicated (most projectors that we use are bi-xenon though).
My halos don’t work or stopped working
Note: As of 12/1/2014 we are NO longer installing or offer halos with any built headlight package. There are too many associated reliability issues. This section is for help in diagnosing your issues to determine how best they can be fixed. Halos are NOT covered in our warranty at all.
One side halo is completely out :: This may be due to a connection issue, wiring issue, fuse issue OR bad halo inverter. Check all connections, fuses or wiring associated with that side halo – THEN – swap inverters to see if the issue follows the inverter.
My halo ring or rings have “dimples” or “dead spots”. This is unfortunately common to LED COB halo rings. After time some of the actual LED chips on the board may fail. There is no way to fix this without removing the ring and replacing with a new unit (or leaving them out all together which we recommend).
Note: If a halo ring needs replacing, this is NOT a warranty covered item (labor wise). There will be associated labor fees and costs.
My ballasts are buzzing
Most HID ballasts make some sort of noise or “buzzing” while operating – it’s simply the sound of electricity being converted and applied to your new HID bulbs.
Some HID ballasts will have noticeable noise during startup (the first 30-60 seconds) and will quiet down a bit. Some will remain noisy for the entire duration of your headlights being on.
This is perfectly normal, not harmful in any way and is not heard during normal driving conditions.
If you have any LOUD arcing sound, this may indicate a problem. This is extremely rare though.
Pivot point guts reset
If your headlights have the symptoms of “loose internal guts” (as described in a few of the other troubleshooting topics on this page), the procedures here may help to diagnose and/or solve this.
The projectors in your HID system sit inside the headlights in what we refer to as “guts”. These guts are held in place by three pivot points.
Sometimes during shipping a package can be handled roughly – it is unfortunate, but it can happen. This can cause the guts to pop off one or more of their pivot points – sometimes with additional damage, but most often it’s simply just a “popped-off” issue.
To rectify this you can gently grab the back of the projector and give it a gently “wiggle”. If it seems to move freely or more than 1-2mm there may be a mounting point internally that has popped off. Simply grab the projector and pull backwards, toward the back of the headlight housing to “pop” it back in place. You’ll hear or feel a small click. Do NOT make sudden or jerking motions – a slow even pressure often pops it back in.
TOO much pressure can damage the internal setup – use caution & patience when doing this.
This can explain a wobbly headlight output, poor adjustment capability, rotation issue with the output, or having a light that’s aimed too low or high.


Moisture issue
What if my headlights are leaking? What if I see fog in them? What if there is a lot of water in them?
With ANY custom headlight build there is the potential risk of them having a moisture issue. This isn’t a common occurrence, but can happen as with anything custom built – there is a chance of an issue arising.
If this should happen – first determine what the severity of the moisture is. A very light fogging, “waterfalls” or a puddle of water?
For fogging or VERY light fogging, we recommend one of two methods to fix this. The first (if you live in a relatively dry climate) is to pop a back cap off of the housing and park the vehicle with the headlight in direct sunlight for a few hours. This often drys the light out and solves the issue. The next method which is slightly quicker is to remove a back cap and aim a hairdryer on LOW at the opening for approximately 30 minutes (or until the light is completely dried out). These are both highly effective.
Fogging can occur as the result of extreme temperature change between the inside of the lights and the outside air temperature – think of a “greenhouse” effect. This isn’t overly common, but can happen especially during colder winter months.
If you are experiencing a “waterfall” effect or a puddle of water in the light you may have a seal or cap issue. To remedy this on your own (should you choose to do so), we recommend taking the light off the vehicle. Drain as much water as possible and then remove a any & all back caps from the housing. Aim a hairdryer on low at a backside opening and allow the light to dry for approximately 30-45 minutes. Then, heat in your oven on LOW (170 degrees or lower if possible) for approximately 20 minutes. The BACK of the headlight housing should sit on the oven shelf – NOT the front lens portion. Once removed from the oven, squeeze the edges of the light housing at the seam. Allow to cool, re-install on the vehicle and watch for moisture over the next 7 days.
The BACK CAPS on headlights are most often the culprit of water or excessive moisture finding it’s way into the housings. This can happen during installation if space is tight or snug behind the headlight.
ALWAYS ensure the caps are in place, snug and not falling-off of your housings.
If you’re not comfortable with any of these procedures please contact us and we’ll make arrangements with you for the repair of your lights. There may be associated costs with this.
Warranty Info
BlackFlameCustoms headlight builds come with a lifetime craftsmanship warranty. That means, for as long as you (the original owner/purchaser) owns your custom built headlights we will make any repairs needed free of charge should something break, fail or go wrong with our specific labor. This is limited to projector retrofits (the mounting/securing of projectors within your housings), shroud installation (shrouds that are installed onto the projectors), custom paint, halo installation (our labor only – halo rings are NOT covered under warranty should they fail), clear lens swaps (associated labor), & specific options that we may have installed. An original work order/build sheet is required for all craftsmanship warranty claims.
For components, parts, accessories and any other build/project related items, these each carry their own specific manufacturer warranty. Claims will be processed through the original manufacturer & we will gladly assist however possible to expedite any issues.
Please note: As stated above, halo ring failure (and any associated labor to replace the ring, should you opt for replacement) is NOT covered under warranty. We no longer offer ANY halo installations on new packages due to extreme unreliability and high failure rates.
Warranties are non-transferable.
BlackFlameCustoms does NOT warranty other peoples work, installations (errors or otherwise) and does not warranty shipping damage. BlackFlameCustoms is not responsible for any 3rd party installation costs, the use or misuse of our products or local laws/regulations regarding the use of our products. All of our products & custom services are intended for off-road use only. Respective claims or handling procedures should be taken up with the appropriate parties. We are happy to assist in any way we can should an issue arise with your headlights.
Condensation & Seal Warranty
All of our headlight builds come with additional sealant installed as a preventative measure. This does not guarantee that moisture or condensation won’t happen. However, this step is taken as a extra precaution. All headlights come with a 1 year condensation/seal warranty. Aftermarket headlight housings fall within this 1 year category as well.
Any condensation/seal issues that require repair by us will have related shipping charges which will be billed to you at the time of completion.
Shipping Precautions
Should your lights need to come back for any reason, please ensure they are packed extremely well. Additional damage may delay your project work and incur additional associated costs.