Aiming Headlights
Alignment, Adjustment & Tweaks:
It should be noted that proper patience, time and surroundings should be available to adjust your lights. It may take a few trial and error adjustments to get them just right and to your personal liking.
All the alignments on your housings can be done through the factory adjustment knobs. If your output is rotationally off there are notes regarding this below, however, please contact us for special assistance as this may indicate an underlying issue.
DO NOT OVER ADJUST ALIGNMENT KNOBS – This can potentially cause damage to your new headlight system. Please contact us should your adjusters not function properly or feel too snug.
- -First, find a good level ground area to park your vehicle on that has an adjacent broad-sided building. Park approximately 30 feet away & facing the wall.
- -Next, measure the distance from the ground to your projector inside the headlight (let’s use 30 inches as an example).
- -With your headlights turned on, measure the lower portion of the DRIVER cutoff step. The goal is for the cutoff step to be approximately 2 inches lower than your projector measurement. So, in our scenario, 30 inches minus 2 inches gives us 28 inches.
- -Then simply align your PASSENGER projector to the same point as your left one.
- -Road test and adjust slightly up or down as needed.
The general adjustment range is 2-4 inches LOWER than what your projector measures, depending on your personal preferences.

Output Tweaks & Rotation:
This section is a basic explanation of projector output that looks “off”, “bad”, “tweaked” or “incorrect”. There are any number of reasons this could have happened to your new headlight retrofit package and what we’ve seen most often as the culprit is shipping damage. The internal components on our headlight builds are extremely reliable & sturdy with regards to standard vehicle use — however, when rough package handling or an overloaded delivery truck puts unexpected stress on a package, something can go wrong.
Below are a few example images of “off”, “bad”, “tweaked” or “incorrect” projector cutoff output. There may be a simple adjustment you can make to rectify the issue or it may require shipping the headlight back for us to repair.
Output Tweaks & Rotation:
This mini-writeup is intended to help you make any basic rotation/output tweaks as needed with your setup. It should be noted that the headlight housings should NOT be opened, modified or altered in any way to do these steps as this voids our warranty – what we’re explaining here are simply adjustments that can be made. .25mm to .5mm can make a big difference in terms of rotation.
MH1 & D2S v2.0&v3.0 Projectors
These projectors are primarily installed using their threaded in collars. While we snug them up very securely and add epoxy to keep things from vibrating loose, there is still a bit of built in rotation adjustment.
-Step 1: Ensure you have the basic tools needed (screwdrivers, sockets, work gloves & projector adjustment tool).
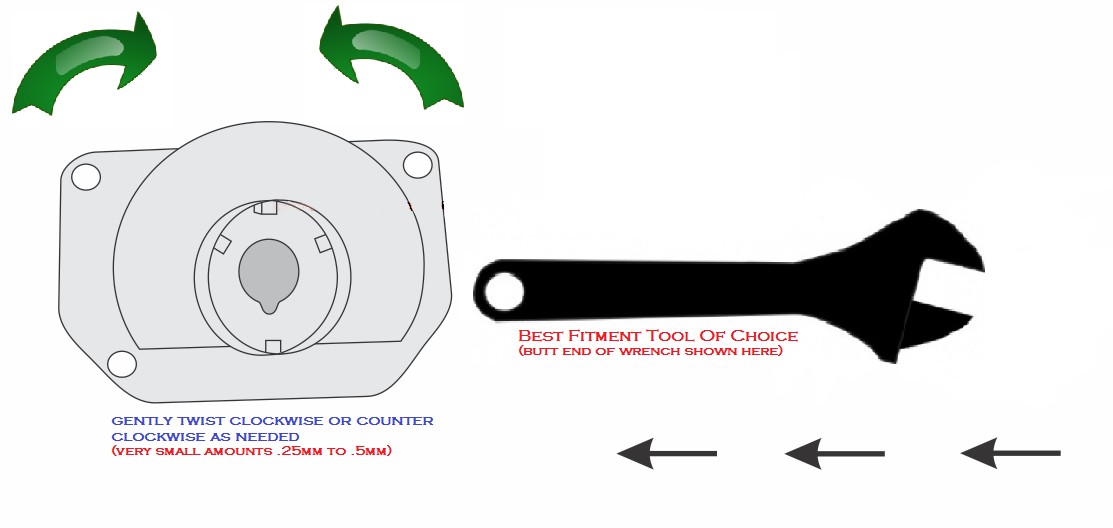
-Step 2: Projector adjustment tool is ANY properly sized tool/object that fits into the bulb slot opening on the back – for MH1’s this is often a pair of scissors – for D2S v2.0’s & v3.0’s this is often the butt end of a ratchet.
-Step 3: Park your vehicle in a good sized lot facing a level flat wall (approximately 30 feet away), take not of the projector output/rotation.
-Step 4: Remove the bulb from your projector that needs a rotation tweak/adjustment (if both, start on drivers side).
-Step 5: Insert the “projector adjustment tool” as noted above and GENTLY twist in the direction needed – if the RIGHT side is low – twist COUNTER-CLOCKWISE – if the LEFT side is low – twist CLOCKWISE.
-Step 6: Re-install bulb (without touching glass) and test output.
-Step 7: Repeat as needed until projector is level (generally 1-2 tries of GENTLY twisting does the trick).
-Step 8: Repeat procedure on opposing side headlight as/if neeeded.
Please contact us should something about your new setup seem out of place.


Posted in: Troubleshoot